Table of contents
Check out 50 essential Kubectl commands across 10 categories for quick reference and to simplify your work
Whether you're a seasoned DevOps engineer or just getting started with Kubernetes, having a quick reference guide can significantly boost your productivity and confidence. In this article, we've created an ultimate Kubectl cheat sheet with 50 essential commands and examples, covering everything from basic operations to advanced configurations. This guide is designed to be your go-to resource for navigating Kubernetes efficiently, helping you execute tasks faster and with greater accuracy.
We have included the Kubectl command for the following areas.
- Basic Commands
- Pod Management
- ConfigMap Management
- Secret Management
- Deployment Management
- Service Management
- Namespace Management
- Persistent Volume Management
- Monitoring and Debugging
- Helm Commands
So, without further delay, let’s begin.
Kubectl Cheat Sheet with Examples For Quick Reference
Here is the ultimate Kubernetes cheat sheet with examples. We have also covered sample outputs for crucial commands.
Basic Commands
1. Get Cluster Information
Retrieves the details about the Kubernetes cluster.
kubectl cluster-info
Sample output
Kubernetes control plane is running at https://192.168.99.100:8443
KubeDNS is running at https://192.168.99.100:8443/api/v1/namespaces/kube-system/services/kube-dns:dns/proxy
Breakdown of the Output:
- Kubernetes control plane: This is the endpoint for the Kubernetes API server, which is the core component that manages the cluster.
- KubeDNS: This service provides DNS within the cluster, allowing you to use domain names instead of IP addresses to reach services within the cluster.
The exact URLs and IP addresses in the output will vary depending on your cluster's configuration. This Kubectl Cheat Sheet command is useful for quickly verifying that your cluster is up and running and that key components are accessible.
2. View Nodes
Lists all the nodes in the Kubernetes cluster.
kubectl get nodes
3. View All Resources in a Namespace
Lists all resources (pods, services, deployments, etc.) in a specific namespace.
kubectl get all -n <namespace>
4. View Detailed Information
Provides detailed information about a resource (e.g., pod, service, deployment).
kubectl describe <resource> <resource-name>
5. Install Pomerium to Your Cluster
Secures Kubernetes clusters with an advanced identity-aware proxy and continuous verification.
kubectl apply -k github.com/pomerium/ingress-controller/config/default/?ref=v0.27.0
It’s an open-source platform. To explore the further steps, check out this Kubernetes- Pomerium Step-by-Step Guide.
Pod Management
6. View Logs from a Single Pod
Fetches logs from a specific pod.\
kubectl logs <pod-name>
Example,
The below Kubernetes command will display the logs for the pod named pomerium-deployment-7d8f6bb6b7-abcde.
kubectl logs pomerium-deployment-7d8f6bb6b7-abcde
The output will show the access logs for a Pomerium pod, including the client IP, timestamp, HTTP method, status code, and user agent.
7. View Logs from a Specific Container in a Pod
If your pod contains multiple containers, you can specify the container name:
kubectl logs <pod-name> -c <container-name>
Example Command:
kubectl logs pomerium-deployment-7d8f6bb6b7-abcde -c nginx-container
8. List All Pods
Lists all pods in the default namespace.
kubectl get pods
9. View Logs Continuously (Stream Logs)
To continuously stream logs from a pod (similar to tail -f in Linux):
kubectl logs -f <pod-name>
Example Command:
kubectl logs -f pomerium-deployment-7d8f6bb6b7-abcde
This Kubernetes cheat sheet command will keep the log stream open and display new log entries in real-time.
10. View Logs for Previous Instances
If a pod has been restarted and you want to view the logs from its previous instance:
kubectl logs <pod-name> --previous
Example Command
This command shows the logs from the previous instance of the specified pod, which is useful for troubleshooting crashes or restarts.
kubectl logs nginx-deployment-7d8f6bb6b7-abcde --previous
11. Create a Pod
Creates a pod with the specified name and image.\
kubectl run <pod-name> --image=<image-name>
12. Delete a Pod
Deletes a pod by name.\
kubectl delete pod <pod-name>
13. Execute Command Inside a Pod
Opens an interactive shell inside a running pod.\
kubectl exec -it <pod-name> -- /bin/bash
Example Command:
kubectl exec -it nginx-deployment-7d8f6bb6b7-abcde -- /bin/bash
This command opens a bash shell inside the nginx-deployment-7d8f6bb6b7-abcde pod, allowing you to run commands interactively.
14. View Pod Security Policies (PSP)
Pod Security Policies control what actions and configurations are allowed for pods in your cluster. You can view existing policies with:
Example Command:
kubectl get psp
This command lists all Pod Security Policies in your cluster.
ConfigMap Management
15. Create a ConfigMap from Literal Values
'Creating a ConfigMap in Kubernetes allows you to store configuration data in a key-value format, which can be consumed by your pods or used by your applications.\
kubectl create configmap <configmap-name> --from-literal=<key>=<value>
Example Command:
kubectl create configmap app-config --from-literal=environment=production --from-literal=log_level=info
This command creates a ConfigMap named app-config with the following key-value pairs:
- environment: production
- log_level: info
16. Create a ConfigMap from a File
You can also create a ConfigMap from a file, where the contents of the file will be stored as the value of the specified key.
kubectl create configmap <configmap-name> --from-file=<key>=<file-path>
Example Command:
kubectl create configmap app-config --from-file=config.json=/path/to/config.json
This Kubectl command creates a ConfigMap named app-config with the key config.json and the contents of the file located at /path/to/config.json as its value.
17. Create a ConfigMap from an Entire Directory
If you have multiple configuration files in a directory, you can create a ConfigMap with all of them at once.
kubectl create configmap <configmap-name> --from-file=<directory-path>
Example Command:
kubectl create configmap app-config --from-file=/path/to/config-directory/
This command creates a ConfigMap named app-config where each file in /path/to/config-directory/ becomes a key in the ConfigMap, with the file's content as the value.
18. View the ConfigMap
After creating the ConfigMap, you can view it using:
kubectl get configmap <configmap-name> -o yaml
Example Command:
kubectl get configmap app-config -o yaml
This Kubectl cheat sheet command will display the app-config ConfigMap in YAML format, showing the keys and their respective values.
Secret Management
19. Create a Secret - Literal Values
Creates a Secret from literal values.
kubectl create secret generic <secret-name> --from-literal=<key>=<value>
Example command:
To securely store sensitive information like passwords, tokens, or keys, you can create a Secret:
kubectl create secret generic db-secret --from-literal=username=admin --from-literal=password=supersecret
This command creates a Secret named db-secret with the username and password for database authentication.
20. View Secrets
By default, the contents of a Secret are base64 encoded. You can view the Secret and decode it using the following command:
kubectl get secret <secret-name> -o yaml
Example Command:
kubectl get secret db-secret -o yaml
This command will display the db-secret Secret in YAML format. To decode the base64-encoded values, you can use a command like:
echo '<encoded-value>' | base64 --decode
21. Create a Secret from a File
You can create a Secret from a file where the contents of the file will be stored as the value of the specified key.
kubectl create secret generic <secret-name> --from-file=<key>=<file-path>
Example Command:
kubectl create secret generic tls-secret --from-file=tls.crt=/path/to/tls.crt --from-file=tls.key=/path/to/tls.key
This command creates a Secret named tls-secret with the following keys and their corresponding file contents:
- tls.crt
- tls.key
22. Use a Secret in a Pod
To use a Secret in a pod, you can reference it in the pod's YAML file, either as an environment variable or as a mounted volume.
Example Command:
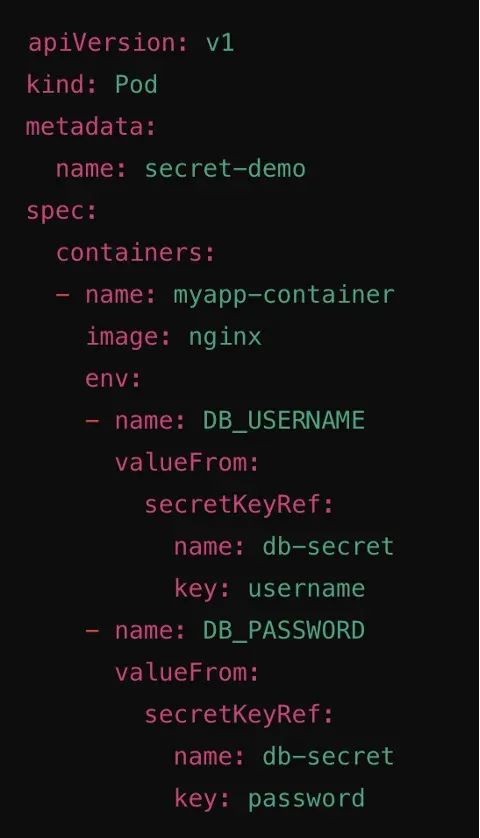
Using Secret as Environment Variables
In this example, the db-secret Secret is used to set the DB_USERNAME and DB_PASSWORD environment variables in the pod.
23. Delete a Secret
If you need to delete a Secret, use the following command:
kubectl delete secret <secret-name>
Example Command:
kubectl delete secret db-secret
This command deletes the db-secret Secret from your cluster.
Deployment Management
24. Create a Deployment
Creates a deployment with a specified name and image.\
kubectl create deployment <deployment-name> --image=<image-name>
25. Scale a Deployment
Scales a deployment to the specified number of replicas.\
kubectl scale deployment <deployment-name> --replicas=<number>
26. Update a Deployment
Updates the image of a container in a deployment.\
kubectl set image deployment/<deployment-name> <container-name>=<new-image>
27. Rollback a Deployment
Rolls back a deployment to the previous version.
kubectl rollout undo deployment/<deployment-name>
28. View Deployment History
Displays the rollout history of a deployment.
kubectl rollout history deployment/<deployment-name>
Service Management
29. Expose a Deployment as a Service
Exposes a deployment as a service. Common types are ClusterIP, NodePort, and LoadBalancer.
kubectl expose deployment <deployment-name> --type=<type> --port=<port>
30. List Services
Lists all services in the default namespace.
kubectl get services
Sample Output:

In this output:
- NAME is the name of the service.
- TYPE indicates the type of service (e.g., ClusterIP, NodePort, LoadBalancer).
- CLUSTER-IP is the service's internal IP address.
- EXTERNAL-IP is the external IP address (if applicable).
- PORT(S) shows the ports exposed by the service.
- AGE indicates how long the service has been running.
31. List All Services in a Specific Namespace
To list services in a specific namespace, use the -n option:
kubectl get services -n <namespace>
Example Command:
kubectl get services -n my-namespace
This important Kubectl cheat sheet command lists all the services in the my-namespace namespace.
32. List Services with More Details
To get more detailed information about the services, you can add the -o wide option:
kubectl get services -o wide
Sample Output:

In this output:
SELECTOR shows the label selector that the service uses to select the pods it routes traffic to.
33. List Services Across All Namespaces
If you want to list all services across all namespaces, you can use the --all-namespaces option:
kubectl get services --all-namespaces

In this output:
The NAMESPACE column shows the namespace each service belongs to.
34. Delete a Service
Deletes a service by name.
kubectl delete service <service-name>
35. View Pod Resource Utilization
Displays CPU and memory usage for nodes or pods.
kubectl top pods
To see the CPU and memory usage of all pods in a specific namespace:
kubectl top pods -n <namespace>
For example, if you want to see the resource usage for all pods in the default namespace:
kubectl top pods -n default
Sample output

In this output:
CPU(cores) indicates the CPU usage for each pod.
MEMORY(bytes) shows the memory usage for each pod.
36. Port Forwarding
Forwards a port from your local machine to a pod.
kubectl port-forward <pod-name> <local-port>:<remote-port>
37. Get Events
Lists recent events in the cluster.
kubectl get events
38. View API Resources
Lists all available API resources.
kubectl api-resources
Namespace Management
39. Create a Namespace
Creates a new namespace.
kubectl create namespace <namespace-name>
40. Switch Between Namespaces
Switches the context to a different namespace.
kubectl config set-context --current --namespace=<namespace-name>
41. Delete a Namespace
Deletes a namespace by name.
kubectl delete namespace <namespace-name>
Persistent Volume Management
42. List Persistent Volumes (PV)
Lists all persistent volumes.
kubectl get pv
Lists Persistent Volume Claims (PVC)
kubectl get pvc
43. Delete a Persistent Volume Claim
Deletes a PVC by name.
kubectl delete pvc <pvc-name>
Monitoring and Debugging
44. To see the CPU and memory usage of all nodes in the cluster
kubectl top nodes
Sample output

In this output:
- CPU(cores) shows the amount of CPU currently being used.
- CPU% shows the percentage of the total CPU capacity being used.
- MEMORY(bytes) shows the amount of memory currently being used.
- MEMORY% shows the percentage of the total memory capacity being used.
Helm Commands
45. Install a Chart
Installs a Helm chart with a specific release name.
helm install <release-name> <chart-name>
46. Upgrade a Release
Upgrades a release to a new chart version.
helm upgrade <release-name> <chart-name>
47. List Releases
Lists all Helm releases.
helm list
48. List Helm Releases with a Specific Status
To filter releases by a specific status, use the --filter option:
helm list --filter <status>
Example Command:
This command lists only the releases that have failed.
helm list --filter failed
49. List Helm Releases in JSON Format
To list Helm releases and output the result in JSON format:
helm list -o json
This is useful for programmatically processing the output.
50. Rollback a Release
Rolls back a release to a previous revision.
helm rollback <release-name> <revision-number>
Wrapping up Kubectl Cheat Sheet
Mastering Kubernetes can be a daunting task, especially when it comes to remembering all the commands and options available in Kubectl, the command-line tool that interacts with your Kubernetes cluster. We hope this Kubectl Cheat Sheet functions as a useful quick reference for your work.
If you are looking for a robust security posture for your Kubernetes, consider Pomerium – the most reliable identity and context-aware proxy solution. It is the best Bastion Host alternative and VPN alternative for teams of all sizes, and works great with K8s to secure the Kubernetes control plan. Learn more about why Pomerium works great with K8s here (Pomerium Kubernetes access).